Earlier this year, I began reading Embedding Formative Assesment by Dylan Wiliam and Siobhan Leahy. In February I was fortunate to hear Dr. Wiliam speak as keynote at this year's T^3 International Conference. Now I'm trying to incorporate some of the ideas in my teaching practice.
Large changes are unlikely to last, so I'm making small moves. I'm focusing on two things in particular. 1) no hands up except to ask a question; and 2) student surveys to encourage self-reflection and increase student ownership of learning.
No hands seemed counter-intuitive to me. But once I read the explanation it made sense. Rather than take volunteers for answers, which encourages some students to show off, some students to check out (by not volunteering), and has little impact on learning, I choose who will answer the questions. I am currently doing my own pseudo-random selection of students, and am working on a more mechanized randomizer. I intended to do this several years ago, but never followed through. As a result, I have a set of poker chips in several colors. I will use different colors for each class, and write student names on the chips.
Already, with my pseudo-random selection, I see slightly better attention. Students understand that calling on them is not an attack. They know they can say they don't know, and there is no penalty. Sometimes I also offer them the option to "phone a friend" and pass the question on to someone else. Other times, I do the selection. In my highly subjective opinion, I have a little bit better engagement.
The student survey is a set of five questions about student feelings on pace of lesson, difficulty, interest in lesson, understanding, and learning as a result of the lesson. I set this up as a Nspire document, which I can distribute to my Calculus class via Nspire Navigator. This is quick and painless for me and the students, and the responses are collated into an easy to read bar graph. My Algebra 2 students don't have Nspire, and I've been giving them a paper survey. I find this cumbersome, as I need to transcribe their answers into a spreadsheet for analysis of trends. I need to figure out a better way to do this on a regular basis with those students.
Wednesday, March 23, 2016
Thursday, March 3, 2016
Friday, December 18, 2015
Designs Nobody Needs
I'm still trying to get facile with designing things for my 3D printer. I had a brief flurry of activity when I attended a workshop (thank you Math for America and Dr. George Hart). At that time I was using Mathematica, and exporting 3D plots. But my license for Mathematica expired, and I can't afford to renew it.
So I've been playing with a free tool, TinkerCAD. They have a library of some basic shapes, and if you fiddle enough with the graphic interface, you can figure out how to edit the shapes. Having attended another workshop recently where we explored Soma cube puzzles, I decided to try to make a design to print a plastic set of Soma cubes.
It's not particularly hard. Cubes are in the basic library of shapes on TinkerCAD. The only thing that took a little while to figure out is how to move an element of my design in the z-axis, since three of the basic pieces are more than one cube unit high. I made my design in two drawings: one of the four single height pieces (big L, little L, T, and Zed); and another of the three double height pieces (right chiral, left chiral, and corner).
TinkerCAD can export to .stl format, which Makerbot Desktop can open and export to .x3g for my printer. I was so proud of myself, I was about to upload the designs to thingiverse. But before doing that, I did a search. Some 48 other Soma cube designs are already up there. Nobody needs mine. But I'm happy I made it. Some day I'll even try printing it and see if it really works.
*** edit 20 Dec 2015 ***
I tried printing, and it didn't work out so good. I think my printer (Makerbot Replicator 2) may be introducing some errors in the z-axis towards the edges of the printing space. The parts more towards the center were fine, but the one furthest out had a sort of curved upper face, where it should have been completely level.
So I tweaked my designs to put just one piece per design, total of seven drawings. I'll give these a try later on today.
*** edit 22 Dec 2015 ***
My "one design per print job" drawings are printing out just fine. But I think the real problem was that the blue tape on my build plate was not sticking securely, and that introduced some waves into the build.
*** edit 5 Jan 2016 ***
An acquaintance asked for the files, so I did upload to thingiverse. Also added pictures to this post.


Monday, December 14, 2015
Soma Puzzle
Episode Three of the George Hart workshop at Math for America.


Given a supply of wooden cubes, how many shapes can you make by combining cubes such that 1) you cannot use more than four cubes, 2) rectangular prisms are not allowed, and 3) faces of cubes must match completely (no halfway or other fractional meetings). Turns out there are exactly seven different shapes.

So, if you glue the wooden cubes together into these shapes, and count them up, you have used exactly 27 cubes. By coincidence, 3^3 is 27. Can you arrange these shapes into a cube?

Yes, you can. Apparently there was a product sold decades ago called a Soma cube. It makes an interesting exploration into 3D geometric transformations. You can make the same pieces from correctly dimensioned cardboard boxes.

But you aren't limited to just a cube shape. You can make a snake, or a doggy, a dinosaur, and other shapes. Providing hours of exploration, all for a few dollars in materials.


Wednesday, December 9, 2015
Paper Construction from George Hart
I've been participating in a series of workshops with George Hart www.georgehart.com, and saw the activity described here at one of the workshop sessions. I tried it yesterday in one of my less-structured classes.
Overview: Students piece together twenty slotted equilateral triangles cut from card stock to make a ball. Here's what the ball looks like:

There are a few interesting things about this construction, and depending on time the facilitator can reveal these things more or less gradually. I didn't have confidence in my students' attention span, and so started on the multi-color construction.
I printed the templates on five colors of Wasau Astrobrights cardstock. Construction calls for four triangles of each color. The template prints eight to a sheet, so I precut them into halves. Students had to further cut into triangles and cut the slots. The slots are how the triangles are pieced together.

Next, students need to explore and figure out how the triangles slide together to form a stable shape. Prompts are: make a natural structure with the triangles, use the slots, structure should be three-dimensional, pieces should not be bent or folded, structure should be symmetric, and should use all twenty triangles.

Here's an example of the basic shape. Notice that five triangles combine to form a pentagonal hole.

Once students have this basic shape, it's a matter of extending around in a ball.


Once they built the ball, I then asked them to take it apart and rebuild it. This time they should make sure each pentagonal hole was surrounded by each of the five colors. About half the class was unwilling to do this. But the other half accepted the challenge and accomplished it, one staying after the bell to complete her project.
Some interesting things: A cube is visible embedded in the ball. There appear to be only four unique ways to assemble the ball with five colors to a pentagonal hole. The figure can be thought of as an icosahedron whose faces are rotated. Positioning five colors around a hole gives to opportunity to discuss permutations involving circles.
Tuesday, November 24, 2015
Hyperboloids from Bamboo Skewers
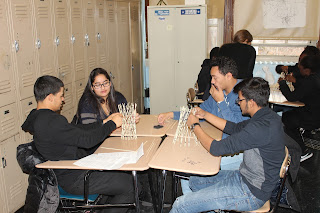
I was fortunate to have a visit today from Dr. George Hart (sponsored by Math for America). George led students in an activity building hyperboloids from barbecue skewers and hair rubber bands. I combined my AP Calculus BC students with a colleague's AP Statistics students for this double-period workshop.
First George explained some of the basic geometry of hyperboloids. One interesting thing in particular is that, while the surface of the hyperboloid is what we would normally call "curved," each point on the surface is the intersection of two straight lines.


The plan was to model a subset of the surface using bamboo skewers. For the model to work, we had to keep a regular pattern of "in front" and "behind." George explained this.

Basic plan was to pair skewers in the middle with a rubber band. Then we would attach pairs of adjacent ends. All the while we must maintain the "in front" and "behind" orientation properly.

Students began work.

Once they reached 12 pairs, they brought the ends around to join in a cylinder.

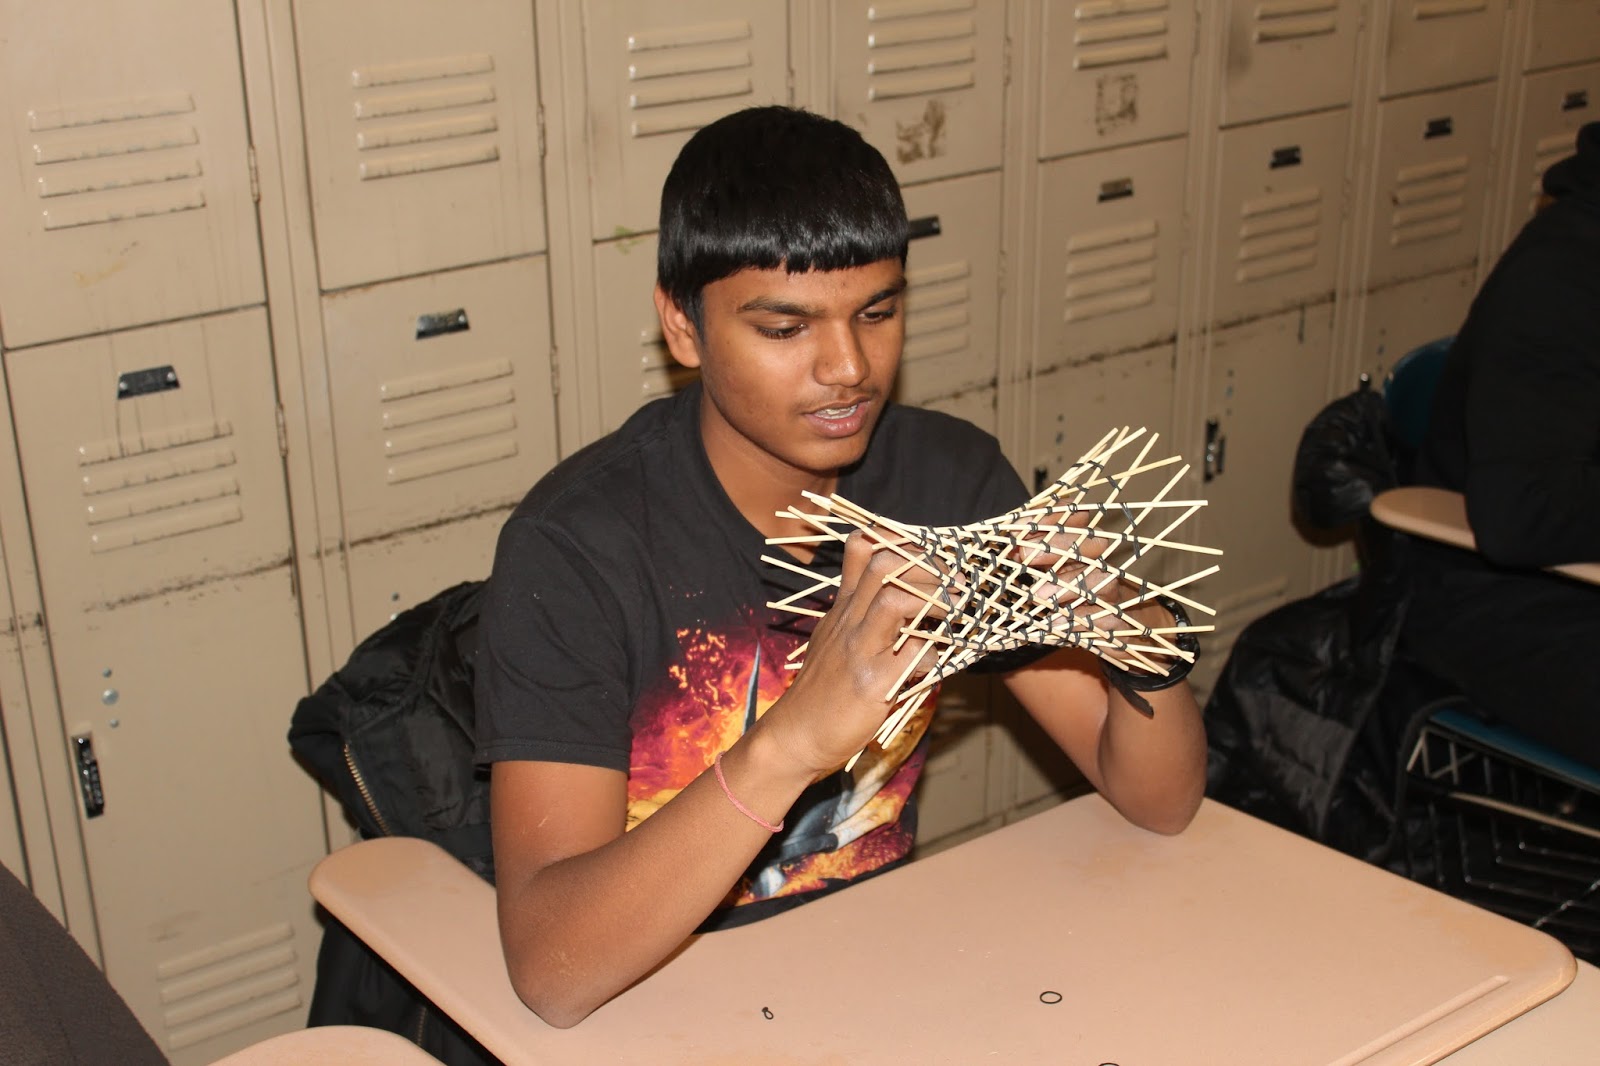
At this point, each pair of skewers is joined by one rubber band in the middle, and each interior skewer is joined to a neighbor exterior skewer by rubber bands at the top and bottom ends. To make room for more joins, the "end" rubber bands are slid in towards the middle. We'll then pair the ends to the new next neighboring skewer with a rubber band

This process is repeated until there are seven or more rubber bands holding each skewer to seven (or more) neighbors.
The constructed hyperboloid can be spread, or collapsed into a bundle of sticks.


Combinations are possible.


A good time was had by all (for the cost of a pack of skewers and a pack of rubber bands)


First George explained some of the basic geometry of hyperboloids. One interesting thing in particular is that, while the surface of the hyperboloid is what we would normally call "curved," each point on the surface is the intersection of two straight lines.


Students began work.

Once they reached 12 pairs, they brought the ends around to join in a cylinder.

At this point, each pair of skewers is joined by one rubber band in the middle, and each interior skewer is joined to a neighbor exterior skewer by rubber bands at the top and bottom ends. To make room for more joins, the "end" rubber bands are slid in towards the middle. We'll then pair the ends to the new next neighboring skewer with a rubber band

This process is repeated until there are seven or more rubber bands holding each skewer to seven (or more) neighbors.

The constructed hyperboloid can be spread, or collapsed into a bundle of sticks.


Combinations are possible.


A good time was had by all (for the cost of a pack of skewers and a pack of rubber bands)


Monday, November 16, 2015
Hands-On Activity Workshop
As a Master Teaching Fellow at Math for America I have the privilege of participating in a variety of meaningful professional development opportunities. One such opportunity began this evening, with the first of a 3 session mini-course led by Dr. George Hart of Stonybrook University.
George first led us through a few drawing exercises -- draw a cube, draw a cube in an isometric projection style, draw a truncated cube, draw an icosahedron, draw a truncated icosahedron. At each step he gave us some pointers on key tricks to make our sketch a bit better. For example, judicious selection of the "front" can make the rest of the sketch so much easier.
In the background, we explored the relationship between vertices, faces, and edges. The point was not to derive Euler's formula, but it was a nice aside. (faces + vertices = edges +2) The real point though was to prepare us for a physical construction.
With our truncated icosahedron sketches as a guide, we took CD-R media and zip ties and began building a physical model of the icosahedron. CD with shiny side out represented the vertices, CD with dull side out represented the edges.
A good time was had by all.


Subscribe to:
Posts (Atom)